JS Intersection Observer, 요소의 가시성 관찰

# 개요
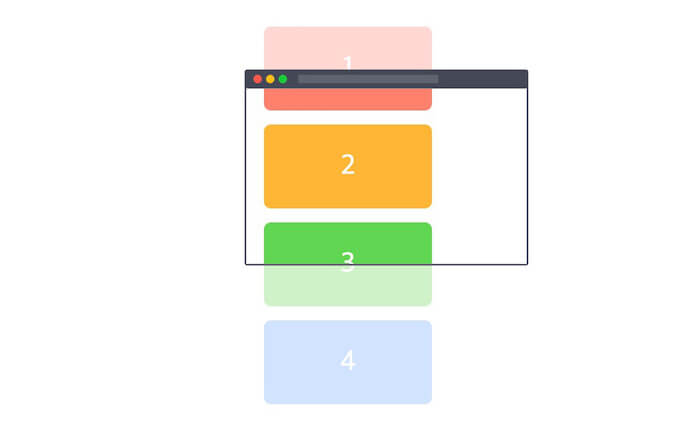
Intersection observer는 브라우저 뷰포트(Viewport)와 설정한 요소(Element)의 교차점을 관찰하며, 요소가 뷰포트에 포함되는지 포함되지 않는지, 더 쉽게는 사용자 화면에 지금 보이는 요소인지 아닌지를 구별하는 기능을 제공합니다.
이 기능은 비동기적으로 실행되기 때문에, scroll 같은 이벤트 기반의 요소 관찰에서 발생하는 렌더링 성능이나 이벤트 연속 호출 같은 문제 없이 사용할 수 있습니다.
 zoom_out_map
new IntersectionObserver()를 통해 생성한 인스턴스(io)로 관찰자(Observer)를 초기화하고 관찰할 대상(Element)을 지정합니다.
생성자는 2개의 인수(callback, options)를 가집니다.
12const io = new IntersectionObserver(callback, options) // 관찰자 초기화 io.observe(element) // 관찰할 대상(요소) 등록
# 콜백
관찰할 대상(Target)이 등록되거나 가시성(Visibility, 보이는지 보이지 않는지)에 변화가 생기면 관찰자는 콜백(Callback)을 실행합니다.
콜백은 2개의 인수(entries, observer)를 가집니다.
123const options = {} const io = new IntersectionObserver((entries, observer) => {}, options) io.observe(element)
# entries
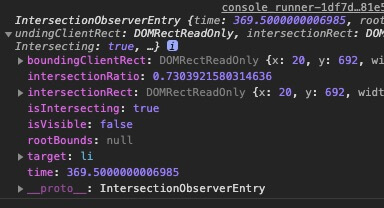
entries는 IntersectionObserverEntry 인스턴스의 배열로, .observe() 메소드로 관찰하는 대상들을 의미합니다.
IntersectionObserverEntry는 읽기 전용(Read only)의 다음 속성들을 포함합니다.
boundingClientRect: 관찰 대상의 사각형 정보(DOMRectReadOnly)intersectionRect: 관찰 대상의 교차한 영역 정보(DOMRectReadOnly)intersectionRatio: 관찰 대상의 교차한 영역 백분율(intersectionRect영역에서boundingClientRect영역까지 비율, Number)isIntersecting: 관찰 대상의 교차 상태(Boolean)rootBounds: 지정한 루트 요소의 사각형 정보(DOMRectReadOnly)target: 관찰 대상 요소(Element)time: 변경이 발생한 시간 정보(DOMHighResTimeStamp)
123456789const io = new IntersectionObserver((entries, observer) => { entries.forEach(entry => { console.log(entry) // entry is 'IntersectionObserverEntry' }) }, options) io.observe(element1) // 관찰 대상 1 io.observe(element2) // 관찰 대상 2 // ...
 zoom_out_map
# entry.boundingClientRect
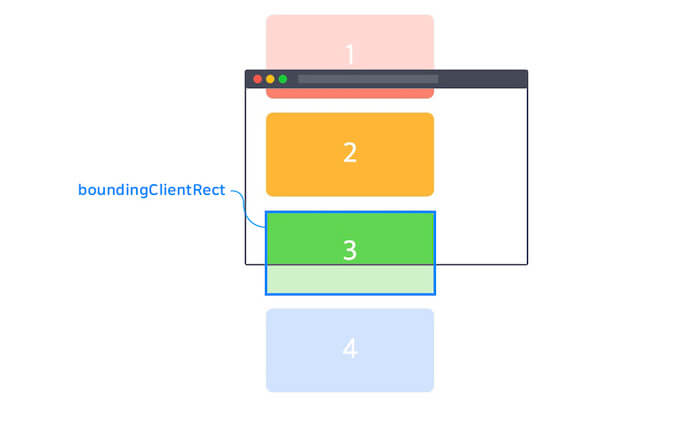
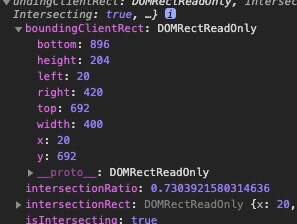
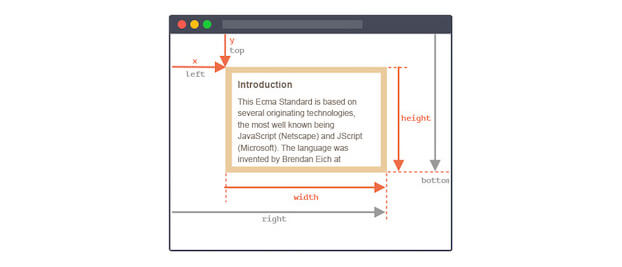
관찰 대상의 사각형 정보(DOMRectReadOnly)를 반환합니다.
이 값은, Element.getBoundingClientRect()를 사용해 동일하게 얻을 수 있습니다.(getBoundingClientRect 호출에서 Reflow 현상이 발생합니다.)
 zoom_out_map
 zoom_out_map
 zoom_out_map
# entry.intersectionRect
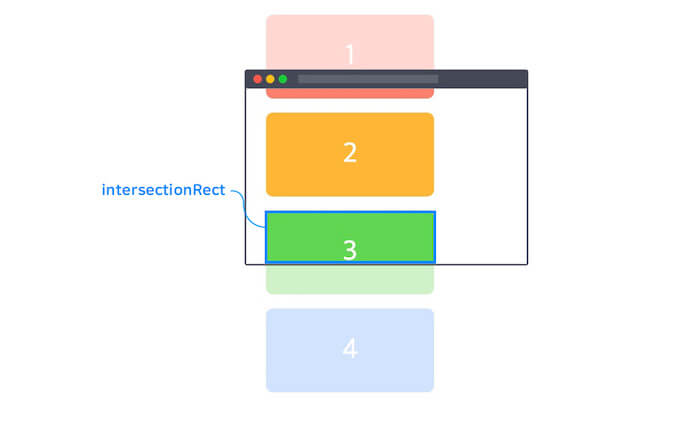
관찰 대상과 루트 요소와의 교차하는(겹치는) 영역에 대한 사각형 정보(DOMRectReadOnly)를 반환합니다.
 zoom_out_map
# entry.intersectionRatio
관찰 대상이 루트 요소와 얼마나 교차하는(겹치는)지의 수치를 0.0과 1.0 사이의 숫자로 반환합니다.
이는 intersectionRect 영역과 boundingClientRect 영역의 비율을 의미합니다.
# entry.isIntersecting
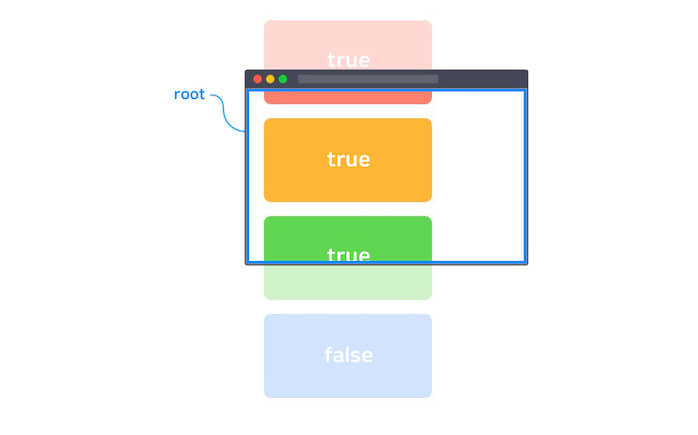
관찰 대상이 루트 요소와 교차 상태로 들어가거나(true) 교차 상태에서 나가는지(false) 여부를 나타내는 값(Boolean)입니다.
 zoom_out_map
# entry.rootBounds
루트 요소에 대한 사각형 정보(DOMRectReadOnly)를 반환합니다.
이는 옵션 rootMargin에 의해 값이 변경되며, 만약 별도의 루트 요소(옵션 root)를 선언하지 않았을 경우 null을 반환합니다.
# entry.target
관찰 대상(Element)을 반환합니다.
# entry.time
문서가 작성된 시간을 기준으로 교차 상태 변경이 발생한 시간을 나타내는 DOMHighResTimeStamp를 반환합니다.
# observer
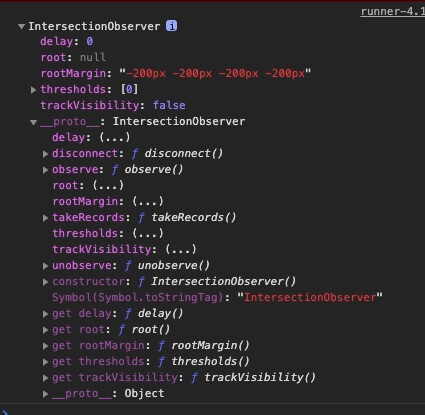
콜백이 실행되는 해당 인스턴스를 참조합니다.
12345const io = new IntersectionObserver((entries, observer) => { console.log(observer) }, options) io.observe(element)
 zoom_out_map
# 옵션
관찰 범위를 설정하기 위한 몇 가지 옵션을 사용할 수 있습니다.
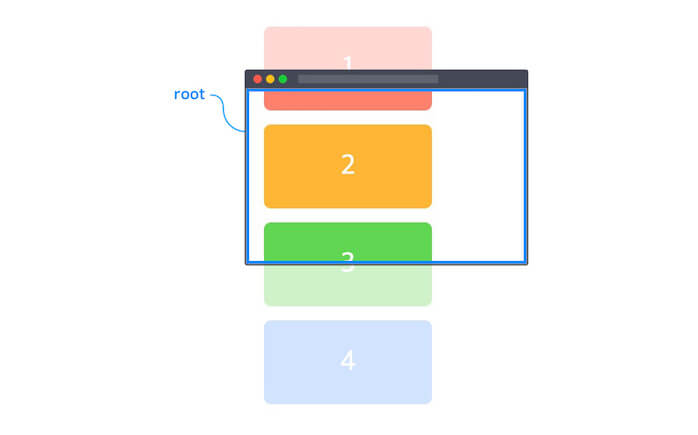
# root
관찰 대상의 가시성을 검사하기 위해 뷰포트 대신 사용할 요소 객체(루트 요소)를 지정합니다.
관찰 대상의 조상 요소이어야 하며 지정하지 않거나 null일 경우 브라우저의 뷰포트가 기본 사용됩니다.
기본값은 null입니다.
123const io = new IntersectionObserver(callback, { root: document.getElementById('my-viewport') })
 zoom_out_map
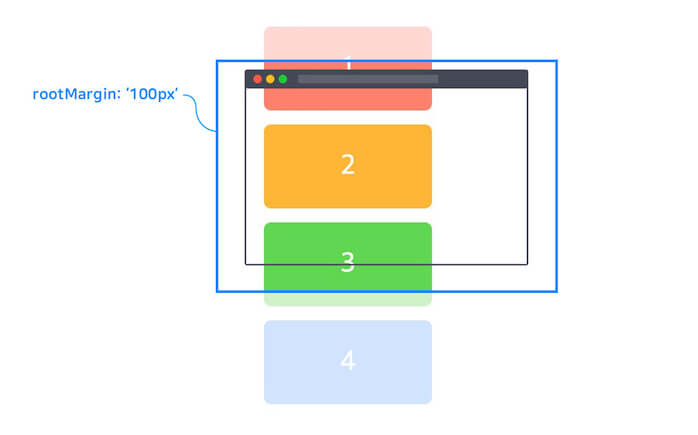
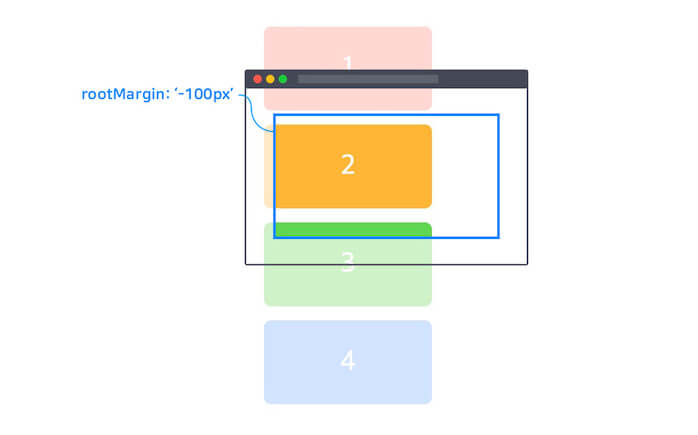
# rootMargin
바깥 여백(Margin)을 이용해 Root 범위를 확장하거나 축소할 수 있습니다.
CSS의 margin과 같이 4단계로 여백을 설정할 수 있으며, px 또는 %로 나타낼 수 있습니다.
기본값은 0px 0px 0px 0px이며 단위를 꼭 입력해야 합니다.
- TOP, RIGHT, BOTTOM, LEFT / e.g.
10px 0px 30px 0px - TOP, (LEFT, RIGHT), BOTTOM / e.g.
10px 0px 30px - (TOP, BOTTOM), (LEFT, RIGHT) / e.g.
30px 0px - (TOP, BOTTOM, LEFT, RIGHT) / e.g.
30px
123const io = new IntersectionObserver(callback, { rootMargin: '200px 0px' })
 zoom_out_map
 zoom_out_map
 zoom_out_map
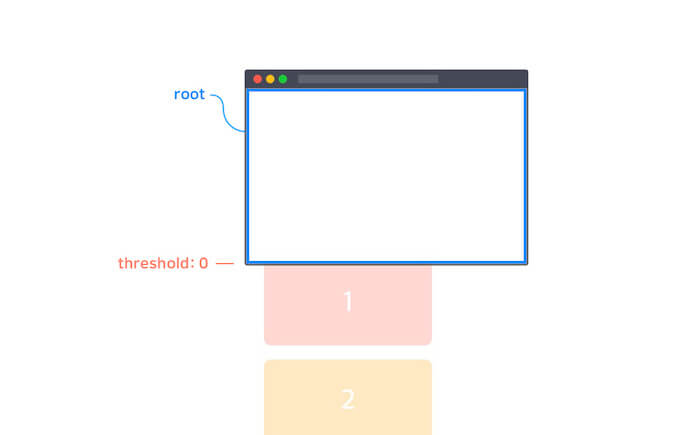
# threshold
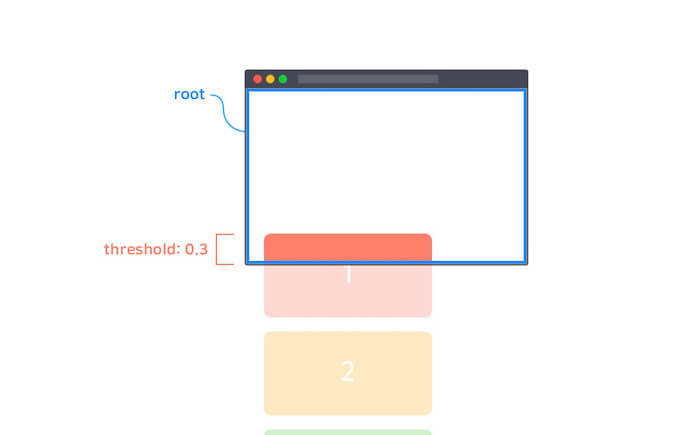
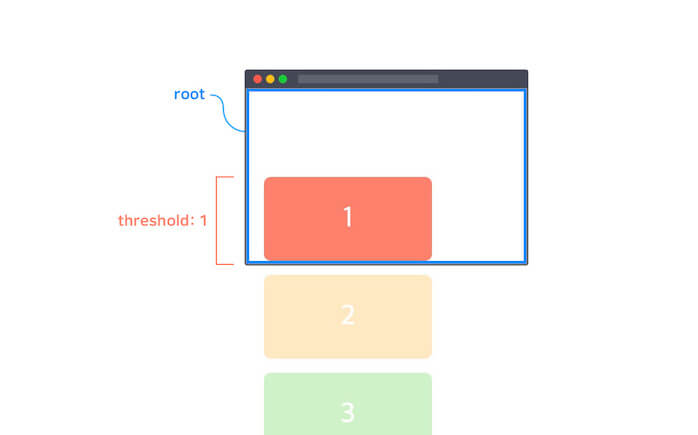
옵저버가 실행되기 위해 관찰 대상의 가시성이 얼마나 필요한지 백분율로 표시합니다.
기본값은 Array 타입의 [0]이지만 Number 타입의 단일 값으로도 작성할 수 있습니다.
0: 관찰 대상의 가장자리 픽셀이 Root 범위를 교차하는 순간(관찰 대상의 가시성이 0%일 때) 옵저버가 실행됩니다.0.3: 관찰 대상의 가시성 30%일 때 옵저버가 실행됩니다.[0, 0.3, 1]: 관찰 대상의 가시성이 0%, 30%, 100%일 때 모두 옵저버가 실행됩니다.
123const io = new IntersectionObserver(callback, { threshold: 0.3 // or `threshold: [0.3]` })
 zoom_out_map
 zoom_out_map
 zoom_out_map
# 메소드
# observe
대상 요소의 관찰을 시작합니다.
12345678910const io1 = new IntersectionObserver(callback, options) const io2 = new IntersectionObserver(callback, options) const div = document.querySelector('div') const li = document.querySelector('li') const h2 = document.querySelector('h2') io1.observe(div) // DIV 요소 관찰 io2.observe(li) // LI 요소 관찰 io2.observe(h2) // h2 요소 관찰
# unobserve
대상 요소의 관찰을 중지합니다.
관찰을 중지할 하나의 대상 요소를 인수로 지정해야 합니다.
단, IntersectionObserver 인스턴스가 관찰하고 있지 않은 대상 요소가 인수로 지정된 경우 아무런 동작도 하지 않습니다.
1234567891011const io1 = new IntersectionObserver(callback, options) const io2 = new IntersectionObserver(callback, options) // ... io1.observe(div) io2.observe(li) io2.observe(h2) io1.unobserve(h2) // nothing.. io2.unobserve(h2) // H2 요소 관찰 중지
콜백의 두 번째 인수 observer가 해당 인스턴스를 참조하므로, 다음과 같이 작성할 수도 있습니다.
1234567891011121314const io1 = new IntersectionObserver((entries, observer) => { entries.forEach(entry => { // 가시성의 변화가 있으면 관찰 대상 전체에 대한 콜백이 실행되므로, // 관찰 대상의 교차 상태가 false일(보이지 않는) 경우 실행하지 않음. if (!entry.isIntersecting) { return } // 관찰 대상의 교차 상태가 true일(보이는) 경우 실행. // ... // 위 실행을 처리하고(1회) 관찰 중지 observer.unobserve(entry.target) }) }, options)
# disconnect
IntersectionObserver 인스턴스가 관찰하는 모든 요소의 관찰을 중지합니다.
12345678910const io1 = new IntersectionObserver(callback, options) const io2 = new IntersectionObserver(callback, options) // ... io1.observe(div) io2.observe(li) io2.observe(h2) io2.disconnect() // io2가 관찰하는 모든 요소(LI, H2) 관찰 중지
# 지원
각 프론트엔드 프레임워크에서 Intersection Observer를 보다 쉽게 사용할 수 있는 라이브러리가 있습니다.
간단한 사용법을 소개하니, 자세한 내용은 각 라이브러리 문서를 참고하세요.
# React
https://www.npmjs.com/package/react-intersection-observer
useInView 훅의 반환으로 ref와 inView를 사용할 수 있습니다.ref는 관찰할 대상 요소에 연결합니다.inView는 관찰 대상의 교차 상태(Boolean)를 나타내는 반응형 데이터입니다.
1npm i react-intersection-observer
12345678910111213141516171819202122import { useEffect } from 'react' import { useInView } from 'react-intersection-observer' export default function Component() { const { ref, inView } = useInView({ rootMargin: '200px 0px', threshold: 0.3 }) useEffect(() => { if (inView) { console.log('Intersecting!') } }, [inView]) return ( <section ref={ref}> <h2>Hello Intersection Observer!</h2> <p>See me? {inView ? 'Yes' : 'No'}</p> </section> ) }
# Vue
https://vueuse.org/core/useIntersectionObserver/
useIntersectionObserver는 관찰 대상, 콜백, 옵션 인수로 순서대로 받아 사용합니다.
1npm i @vueuse/core
1234567891011121314151617181920212223242526<script setup lang="ts"> import { ref } from 'vue' import { useIntersectionObserver } from '@vueuse/core' const target = ref<HTMLElement | null>(null) const inView = ref(false) useIntersectionObserver( target, ([{ isIntersecting }]) => { inView.value = isIntersecting console.log('Intersecting!') }, { rootMargin: '200px 0px', threshold: 0.3 } ) </script> <template> <section ref="target"> <h2>Hello Intersection Observer!</h2> <p>See me? {{ inView ? 'Yes' : 'No' }}</p> </section> </template>
# Svelte
https://github.com/metonym/svelte-intersection-observer
IntersectionObserver 컴포넌트를 사용해, 관찰 대상 참조와 교차 상태 데이터를 연결합니다.
반응형 구문($:)을 사용해 교차 상태에 따른 동작을 처리합니다.
1npm i svelte-intersection-observer
123456789101112131415161718192021<script lang="ts"> import IntersectionObserver from 'svelte-intersection-observer' let element: HTMLElement let intersecting: boolean $: if (intersecting) { console.log('Intersecting!') } </script> <IntersectionObserver bind:intersecting {element} rootMargin="200px 0px" threshold={0.3}> <section bind:this={element}> <h2>Hello Intersection Observer!</h2> <p>See me? {intersecting ? 'Yes' : 'No'}</p> </section> </IntersectionObserver>
# polyfill
IntersectionObserver API를 지원하지 않는 브라우저(MSIE)에서도 사용할 수 있도록 공식적으로 라이브러리가 지원됩니다.
따로 설정할 것 없이 모듈을 가져오기만 하면 됩니다.
1npm i intersection-observer
1234567891011// For IE import 'intersection-observer' // 동일하게 사용하면 됩니다. const io = new IntersectionObserver(callback, options) const els = document.querySelectorAll('element') // For IE Array.prototype.slice.call(els).forEach(el => { io.observe(el) })
혹은 다음과 같이 전역으로 사용할 수도 있습니다.
1<script src="https://polyfill.io/v3/polyfill.min.js?features=IntersectionObserver"></script>
# 예제
# Infinite scroll
 zoom_out_map
끝까지 읽어주셔서 감사합니다.
좋아요와 응원 댓글은 블로그 운영에 큰 힘이 됩니다!