Svelte 개요 및 기본 문법

# 개요
Svelte(스벨트)는 Rich Harris가 제작한 새로운 접근 방식을 가지는 프론트엔드 프레임워크입니다.
Svelte는 자신을 '프레임워크가 없는 프레임워크' 혹은 '컴파일러'라고 소개합니다.
이는 Virtual(가상) DOM이 없고, Runtime(런타임)에 로드할 프레임워크가 없음을 의미합니다.
기본적으로 빌드 단계에서 구성 요소를 컴파일하는 도구이므로 페이지에 단일 번들(bundle.js)을 로드하여 앱을 렌더링할 수 있습니다.
다른 프레임워크와 Svelte의 주요 차이점을 알아봅시다.
Svelte는 높은 가독성을 유지하며 더 적은 코드를 작성할 수 있습니다.
다음의 Svelte 코드를 살펴보세요.
12345678<script> let a = 1 let b = 2 </script> <input type="number" bind:value={a} /> <input type="number" bind:value={b} /> <p>{a} + {b} = {a + b}</p>
위 코드는 React와 Vue에서 다음과 같이 작성할 수 있습니다.
123456789101112131415161718192021import React, { useState } from 'react' export default function () { const [a, setA] = useState(1) const [b, setB] = useState(2) function handleChangeA(event) { setA(Number(event.target.value)) } function handleChangeB(event) { setB(Number(event.target.value)) } return ( <div> <input type="number" value={a} onChange={handleChangeA} /> <input type="number" value={b} onChange={handleChangeB} /> <p>{a} + {b} = {a + b}</p> </div> ) }
123456789101112131415161718<template> <div> <input type="number" v-model.number="a" /> <input type="number" v-model.number="b" /> <p>{{a}} + {{b}} = {{a + b}}</p> </div> </template> <script> export default { data: function() { return { a: 1, b: 2 } } } </script>
# No virtual DOM
Svelte는 Virtual(가상) DOM을 사용하지 않습니다.
Virtual DOM은 충분히 빠르고 유용하지만 이는 기능이 아닌 수단일 뿐이며, 이를 사용하지 않고도 유사한 프로그래밍 모델을 얻을 수 있다고 Svelte는 설명합니다.
새로운 Virtual DOM을 이전 Snapshot과 비교하거나(Diffing), 상태 변화에 따른 새로운 가상 요소 생성 등에 많은 오버헤드가 있을 수 있으며 최종적으론 실제 DOM을 업데이트해야 하므로 그 과정을 생략하는 것이 더욱 빠를 수 있다고 합니다.
이에 대한 더 자세한 내용은 Virtual DOM is pure overhead에서 더 자세하게 확인할 수 있습니다.
# 반응성
반응성은 변경된 값이 DOM에 자동으로 반영됨을 의미합니다.
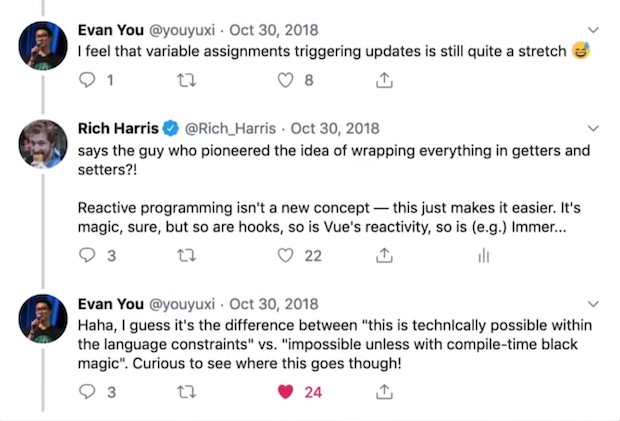
Svelte는 별도의 Setter 없이 값의 할당(assignments)만으로 업데이트를 트리거(Trigger)할 수 있습니다.
1234567<script> let count = 0 </script> <button on:click={() => count += 1}> {count} </button>
컴파일 결과가 할당을 계측하고 DOM을 갱신합니다.
1$$invalidate('count', count += 1)
이는 다음과 같이 Store 사용에도 굉장한 이점을 부여합니다.
123import { writable } from 'svelte/store' export const count = writable(0) // similar to `count = 0`
count는 writable()에서 반환된 쓰기용 객체 데이터이기 때문에,$ 접두사($count)를 사용해 Store를 참조하겠다는 의미로 사용할 수 있습니다.
1234567<script> import { count } from './store.js' </script> <button on:click={() => $count += 1}> {$count} </button>
 zoom_out_map
# 성능
W3C HTML5 Conf 2019에서 변규현 님의 Svelte와 React 퍼포먼스 비교 시연은 생각보다 놀라웠습니다.
메모리 사용량의 비교 결과를 보시면 차이가 확실히 느껴지는데, 컴파일 Output이 워낙 작기도 하고 가상 DOM Diffing이 없어서인지 훨씬 안정적으로 동작하고 있었습니다.
발표 자료는 변규현 님의 블로그(Let's start SVELTE, goodbye React & Vue)에서 확인하실 수 있습니다.
 zoom_out_map
# 기본 문법
Svelte의 전반적인 내용을 비교적 가볍게 다뤄, 주요 특징을 빠르게 이해해 봅시다.
# Svelte REPL
Svelte REPL(레플)이 준비되어 있습니다.
'+' 버튼을 눌러 파일을 추가하고 상대경로(확장자를 작성해야 합니다)로 접근할 수 있습니다.
# 선언적 렌더링
- 보간법: 내용 / 속성 / 표현식 보간
- 반응성: 할당(
=) - 클래스와 스타일: 클래스와 스타일 속성 바인딩
- 요소 바인딩: 입력 요소 바인딩(Properties, group) 패턴 정리
- 사용자 입력 핸들링: 인라인 이벤트 핸들러
123456789101112131415161718192021222324<script> let name = 'world' let age = 85 function assign() { name = 'Heropy' age = 36 } </script> <h1>Hello {name}!</h1> <h2 class={age < 85 ? 'active': ''}>{age}</h2> <img src="" alt={name} /> <input type="text" bind:value={name} /> <button on:click={assign}>Assign</button> <style> h1 { color: red; } .active { color: blue; } </style>
# 조건문과 반복문
- 조건과 반복: 조건 블록 패턴 정리, 반복 블록 패턴 정리
1234567891011121314<script> let name = 'world' let toggle = false </script> <button on:click={() => {toggle = !toggle}}> Toggle </button> {#if toggle} <h1>Hello {name}!</h1> {:else} <div>No name!</div> {/if}
1234567891011121314151617<script> let name = 'Fruits' let fruits = ['Apple', 'Banana', 'Cherry', 'Orange', 'Mango'] function deleteFruit() { fruits = fruits.slice(1) } </script> <h1>Hello {name}!</h1> <ul> {#each fruits as fruit} <li>{fruit}</li> {/each} </ul> <button on:click={deleteFruit}> Eat it! </button>
# 이벤트 핸들링
- 사용자 입력 핸들링: 인라인 이벤트 핸들러, 다중 이벤트 핸들러
1234567891011121314151617181920212223242526272829<script> let name = 'world' let isRed = false function enter() { name = 'enter' } function leave() { name = 'leave' } </script> <h1>Hello {name}!</h1> <div class="box" style="background-color: {isRed ? 'red' : 'orange'};" on:click={() => { isRed = !isRed }} on:mouseenter={enter} on:mouseleave={leave}> Box! </div> <style> .box { width: 300px; height: 150px; background-color: orange; } </style>
1234567891011121314151617<script> let text = '' </script> <h1> {text} </h1> <input type="text" value={text} on:input={e => {text = e.target.value}} /> <input type="text" bind:value={text} /> <button on:click={() => {text = 'Heropy'}}> Click </button>
# 컴포넌트
- 반응성: 데이터의 불변성과 가변성
- 컴포넌트: 컴포넌트 개요(with 컴포넌트 바인딩), 부모에서 자식으로(Props)
12345678910<script> import Fruits from './Fruits.svelte' let fruits = ['Apple', 'Banana', 'Cherry', 'Orange', 'Mango'] </script> <Fruits {fruits} /> <Fruits {fruits} reverse /> <Fruits {fruits} slice="-2" /> <Fruits {fruits} slice="0, 3" />
12345678910111213141516171819202122232425262728<script> // Props export let fruits export let reverse export let slice let computedFruits = [] let name = '' if (reverse) { computedFruits = [...fruits].reverse() name = 'reverse' } else if (slice) { computedFruits = fruits.slice(...slice.split(',')) name = `slice ${slice}` } else { computedFruits = fruits } </script> <h2> Fruits {name} </h2> <ul> {#each computedFruits as fruit} <li>{fruit}</li> {/each} </ul>
# 스토어
- 스토어: 쓰기 가능 스토어(writable) & 수동 구독과 자동 구독
12345678910111213<script> import { storeName } from './store.js' import Parent from './Parent.svelte' let name = 'world' // let $hello = '' // Error! $storeName = name // console.log(storeName) // 스토어 객체 // console.log($storeName) // 스토어 값(데이터) </script> <h1>Hello {name}!</h1> <Parent />
12345678<script> import Child from './Child.svelte' </script> <div> Parent </div> <Child />
1234567<script> import { storeName } from './store.js' </script> <div> Child {$storeName} </div>
123import { writable } from 'svelte/store' export let storeName = writable('Heropy')
# Todo 예제 만들기
123456789101112131415161718192021222324252627282930313233<script> import { writable } from 'svelte/store' import Todo from './Todo.svelte' let title = '' let todos = writable([]) let id = 0 function createTodo() { if (!title.trim()) { title = '' return } $todos.push({ id, title }) $todos = $todos title = '' id += 1 } </script> <input bind:value={title} on:keydown={(e) => {e.key === 'Enter' && createTodo()}} /> <button on:click={createTodo}> Create Todo </button> {#each $todos as todo} <Todo {todos} {todo} /> {/each}
12345678910111213141516171819202122232425262728293031323334353637383940<script> export let todos // Store! export let todo let isEdit = false let title = '' function onEdit() { isEdit = true title = todo.title } function offEdit() { isEdit = false } function updateTodo() { todo.title = title $todos = $todos offEdit() } function deleteTodo() { $todos = $todos.filter(t => t.id !== todo.id) } </script> {#if isEdit} <div> <input type="text" bind:value={title} on:keydown={(e) => {e.key === 'Enter' && updateTodo()}} /> <button on:click={updateTodo}>OK</button> <button on:click={offEdit}>cancel</button> </div> {:else} <div> <span>{todo.title}</span> <button on:click={onEdit}>Edit</button> <button on:click={deleteTodo}>Delete</button> </div> {/if}
끝까지 읽어주셔서 감사합니다.
좋아요와 응원 댓글은 블로그 운영에 큰 힘이 됩니다!